JITSI – VIDEO CHAT SERVER
Debian 10
Connecting to Debian 10 with Jitsi – Video Chat Server
To start the server, run the VM through Azure Portal.
- For the connection to the server, you should know the IP address of the VM. You can find it in the personal account of Azure. You need to select the virtual machine from the list. By clicking the item “Overview”, your IP is displayed in the line “Public IP Address”

- To work, you must open ports 22, 80, 443, 4443, 4444, 8443, 10000 TCP, and 10000 UDP in the network properties in the Azure firewall.

- Create a DNS name that will be used for further connection.
- You can specify your DNS name (for which an SSL certificate has already been purchased) and skip this step. In this case, we recommend you to read the following documentation: https://github.com/jitsi/jitsi-meet/blob/master/doc/quick-install.md
- To create a DNS name through Azure Portal, go to the VM settings in the “Overview” section.
Go to “DNS name” settings

- Fill in the “DNS name label” field and click <Save> at the top.

- To manage with a Jitsi server, you should connect to a VM.
- With OpenSSH
In the Windows 10 operating system (starting with version 1809 ), an OpenSSH client is available, with which you can connect to Linux servers via SSH. If Windows 10 is suitable and the OpenSSH client is installed, you can start connecting via SSH. To do this, launch a normal Windows command prompt and enter the command “ssh user@*vm_ip*” (1), where “user” is the username that was specified while creating the virtual machine and “*vm_ip*” is the VM IP address.
Then type “Yes” (2) and enter a password (3) that was specified while creating the virtual machine.

- With the PuTTy application
To do this, you need the PuTTy application to connect via ssh. You can download it at the following link – Download
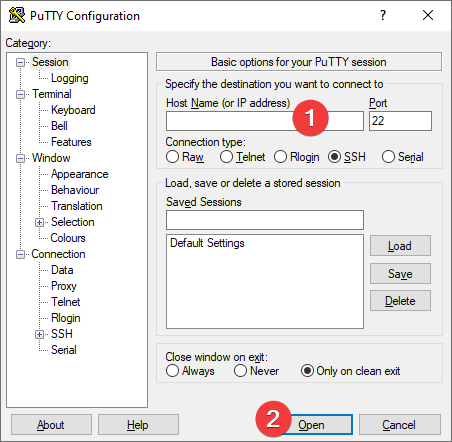
Run Putty, enter the VM address in the “Host” field (1), and click “Open” (2) to connect.

In the opened console, you will need to enter a username (1) and password (2) that were specified while the VM was being created (you’ll not see the password in the console while entering it).

- To enter created DNS name, type the command sudo jitsetdns and paste your DNS name:

- To start chatting in a browser, follow the link from step 3. Now you can create and connect to the rooms. To do this, enter a name in the “Start a new meeting” field and press <Go>. The list of available rooms is displayed below, just click LMB on it to connect

