IPsec/L2TP VPN Server
Ubuntu 18.04 LTS
Configuring and connecting IPsec/L2TP VPN Server on Ubuntu 18.04 LTS
In case you have NSG’s or Firewall appliances in Azure you’ll have to open access to the next ports: 500, 4500 (UDP).
In order to open the ports, go to the Virtual machine’s settings in Azure Marketplace – open Networking and add the necessary ports.
Managing a server on Ubuntu
- To configure the server, you should connect to the VM and call the game console. To connect, you need PuTTy application to connect via ssh. You can download it at the following link – Download.
- Run Putty, enter the VM address in the “Host” field, and click “Open” to connect.

- In the opened console it is necessary to enter a username and password that were specified while creating the virtual machine.
- Enter the following command:
> sudo su
The VM automatically generates one user, to view the login and password, please enter:
> cat /etc/ppp/chap-secrets
In order to add a user, please enter:
> addvpnuser username userpass
And confirm the creation of the user by typing “Y” and Enter in the console
(where, instead of ‘username”, enter any preferred username, and instead of userpass, enter any preferred password)
If the user has already been created, the password will be overwritten!
Deleting a username
:
> delvpnuser username
To view the PSK key of your VM, enter:
> cat /etc/ipsec.secrets
This key will be required for the further creation of a connection to the VPN server.
Creating a connection on OS Windows 10
- Right-click on the Internet connection icon in the system tray:

- Select “Open Network and Sharing Center” (Or, if using Windows 10 version 1709 or newer, select Open Network & Internet settings, then on the page that opens, click Network and Sharing Center)
- Press “Set up a new connection or network”:

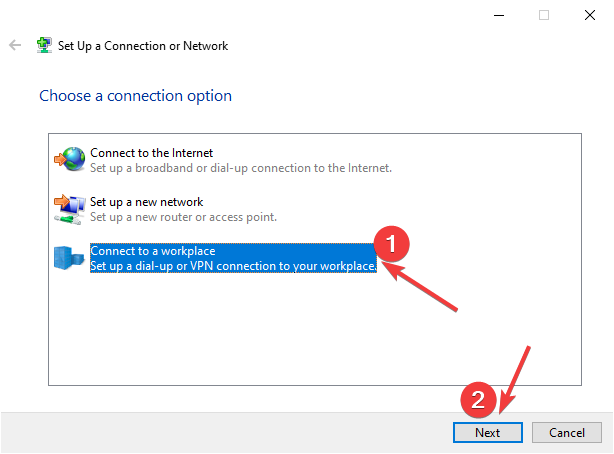
- Select“Connect to a workplace” and press “Next”:

5. Press “Use my Internet connection (VPN)”:

6. Then, enter your IP VM into the “Internet address” field and a preferred connection name into the “Destination name” field, following which press “Create”:

7. Go back to “Network and Sharing Center” and select “Change adapter settings”:

8. Right-click on the previously created VPN connection icon and select “Properties”:

- In the pop-up window, go to the “Security” tab.
Select “Layer 2 Tunneling Protocol with IPsec (L2TP/IPSec)” for the Type of VPN.
Press “Allow these protocols” and tick “Challenge Handshake Authentication Protocol (CHAP)” and “Microsoft CHAP Version 2 (MS-CHAP v2)” checkboxes:

- In the same window, click on “Advanced settings” and select “Use preshared key for authentication” and enter the PSK key of your VM (information on where and how to view the key is described above in the “Server Management on Ubuntu” section) and click “OK “
- Click “OK” in the “VPN Connection Properties” window and confirm saving by clicking “Yes” in the “Network Connections” window:

Everything is ready to connect. Now click LMB on the Internet connection icon in the system tray; click on the previously created connection and click “Connect”:

Enter the username and password of any VPN user created on the VM in the authorization window:

Now your external IP address has changed and you are using the Internet through the VPN server of the virtual machine.
In case of an error: “The network connection between your computer and the VPN server could not be established because the remote server is not responding. This could be because one of the network devices (e.g, firewalls, NAT, routers, etc) between your computer and the remote server is not configured to allow VPN connections. Please contact your Administrator or your service provider to determine which device may be causing the problem”
To fix this error, a one-time registry change is required because the VPN server and/or client is behind NAT (e.g. home router). Run the following from an elevated command prompt. You must reboot your PC when finished.
For Windows Vista, 7, 8.x and 10:
REG ADD HKLM\SYSTEM\CurrentControlSet\Services\PolicyAgent /v AssumeUDPEncapsulationContextOnSendRule /t REG_DWORD /d 0x2 /f
For Windows XP ONLY:
REG ADD HKLM\SYSTEM\CurrentControlSet\Services\IPSec /v AssumeUDPEncapsulationContextOnSendRule /t REG_DWORD /d 0x2 /f
Although uncommon, some Windows systems disable IPsec encryption, causing the connection to fail. To re-enable it, run the following command and reboot your PC.
For Windows XP, Vista, 7, 8.x and 10:
REG ADD HKLM\SYSTEM\CurrentControlSet\Services\RasMan\Parameters /v ProhibitIpSec /t REG_DWORD /d 0x0 /f
